
Class type : 2 days a week online 1 hr each (Total Course Rs. 12000/ - duration 12 weeks or 3 months )
Days : Monday-Friday
Time slots : Evening : 4:00-5:00 pm, 5:00-6:00pm, 6:00-7:00 pm, 7:00-8:00pm
Weeks 1-2: The Foundation of a Professional Workflow
Week 1: Interface & Core Concepts for Retouching
The Photoshop Interface: Customizing your workspace for a retouching-focused workflow.
Layers and Non-Destructive Workflow: The absolute importance of layers, layer masks, and adjustment layers.
File Management: Understanding RAW vs. JPEG, file naming conventions, and project folder structures.
Introduction to Essential Tools: Move (V), Crop (C), Marquee (M), and Lasso (L).
Week 2: Advanced Selections and Masks
The Select and Mask Workspace: Mastering this tool for precise hair, fur, and intricate selections.
Refining Selections: Using the Refine Edge and other tools to perfect your masks.
Vector Masks: An introduction to the Pen Tool (P) for creating perfect, scalable selections for products and clean edges.
Channels: Understanding how color channels can be used to create complex selections.
Weeks 3-4: Essential Retouching and Correction
Week 3: The Retouching Toolkit
Introduction to Healing Tools: Spot Healing Brush (J), Healing Brush, and the Patch Tool.
Clone Stamp Tool (S): Mastering the clone stamp for texture replacement and background cleanup.
Content-Aware Fill: Using Shift+F5 to intelligently remove unwanted objects.
Liquify Filter: An introduction to shaping and subtle body modification without distortion.
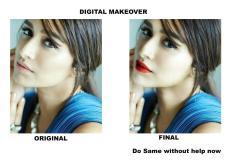
Week 4: Advanced Skin Retouching Fundamentals
Introduction to Frequency Separation: The concept of separating texture and color to non-destructively fix skin.
The Low Frequency Layer: Blurring and smoothing color tones.
The High Frequency Layer: Preserving and enhancing skin texture.
Practical Application: A hands-on project for non-destructive blemish and wrinkle removal.
Weeks 5-6: Advanced Retouching and Shaping
Week 5: The Art of Dodging and Burning
Manual Dodging and Burning: Using layers and blending modes (Soft Light, Overlay) to selectively lighten and darken areas.
Non-Destructive D&B: The use of Curves and adjustment layers for precise tonal control.
Advanced Skin D&B: Sculpting facial features, adding dimension, and evening out skin tones.
Week 6: Advanced Liquify and Hair Retouching
Mastering the Liquify Filter (Shift+Ctrl+X or Shift+Cmd+X): Using the Freeze Mask and Thaw Mask for precision.
Puppet Warp: Using this tool for subtle posing adjustments and garment shaping.
Hair Retouching: Techniques for fixing flyaway hairs, adding texture, and creating clean lines.
Weeks 7-8: Professional Color Grading
Week 7: Color Correction and Adjustment Layers
Understanding Color: Color theory, HSL, RGB, and CMYK color spaces.
Essential Adjustment Layers: Mastering Curves, Levels, and Hue/Saturation.
Color Toning: Using Color Balance and Selective Color for precise color shifts.
Week 8: Creative Color Grading and Look Development
Gradient Map & Selective Color: Using these tools to create specific cinematic or stylized looks.
LUTs (Lookup Tables): Understanding what LUTs are and how to create and apply your own for consistent color grading.
Working with Multiple Looks: Creating and saving different color grades for client presentations.
Weeks 9-10: Compositing and Creative Post-Processing
Week 9: Seamless Compositing Fundamentals
Matching Lighting and Perspective: Ensuring all elements look like they belong in the same scene.
Creating Realistic Shadows and Highlights: Using masks, blending modes, and curves to integrate elements.
Background and Environment Manipulation: Extending backgrounds and replacing skies.
Week 10: Digital Assets and Advanced Compositing
Working with Digital Assets: Integrating stock photos, textures, and overlays.
Creating Special Effects: Adding elements like smoke, fire, or digital particles.
Advanced Blending: A deep dive into blending modes for creating surreal or impactful imagery.
Weeks 11-12: Automation and Final Output
Week 11: Speed and Efficiency
Smart Objects: The core of a non-destructive, scalable, and flexible workflow.
Actions and Batch Processing: Creating and running actions to automate repetitive tasks and speed up your workflow.
Custom Brushes: Creating and managing custom brushes for special effects and detailed retouching.
Week 12: Final Output and Professional Practices
Color Management: Setting up and working with correct color profiles (sRGB for web, CMYK for print).
Sharpening for Output: Different sharpening techniques for print vs. web.
Exporting for Different Platforms: Using Export As and Save for Web to create optimized files for various clients.
Final Project: A professional retouching and compositing project from start to finish, showcasing all learned skills.